How to Remove Seating Slings
IMPORTANT: Measure your slings before you remove them!
There are various methods that can be used to remove the fabric from your outdoor patio furniture frames. The method we use is shown below. In most cases, time, dirt and weather elements will cause the slings to be adhered to the channel in the side rails of the frames, so force as well as technique may be required to remove them.
Let’s take a typical chair as an example. Similar design and construction is used for all types of sling patio furniture, so pretty much any other type of sling can be removed using the same principles. Please read the steps below completely before starting your sling removal project.
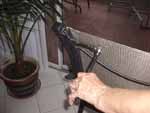
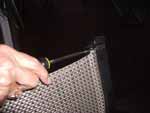 [1] Remove the End Caps
Using a flat screw driver, carefully pry all the end caps out of the side rails, top and bottom. Be careful — they may be brittle from exposure to sunlight. We do not sell these end caps. Keep them aside for later replacement.
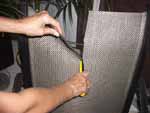 [2] Slit the Sling
With a utility knife or scissors, cut the sling in two from top to bottom. You may be able to remove the slings now. Try pulling them up through the top of the rails, or down through the bottom. Using pliers on the end of the fabric may help. But they may be stuck, in which case, go to step 3.
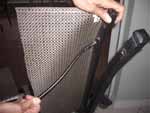
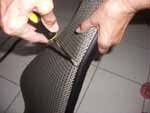 [3] Free Up the Splines
The sling is usually stuck in the side rails. To free it up, first squirt a solution of 1/2 water and 1/2 liquid soap along the entire length of each side rail. Next, carefully push the hem and spline of the sling into the side rail channels with your flat screwdriver. You might hear a slight cracking sound as the fabric breaks free from the metal side rail channels. Be careful not to damage the side rails.
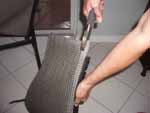 [4] Remove the Sling
You may need to use a pair of pliers to pull the sling out of each side rail channel. If there is much resistance, go back with your screwdriver and look for any more stuck spots.
 [5] Loosen the Bolts
Loosen all the bolts holding the side rails to the seat frame. At this point, leave the rails attached to the chair frame, because it is easier to insert your new sling into a rail that is held firmly in place.
 [6] Remove the Spreader Bars
Now that the side rails are loose, you can easily remove the spreader bars. Keep them aside for later replacement.
How to InstallSling FabricsPlace an OrderTool RentalSling Replacement Service